Top Tips for Using Clear Silicone Sealant Effectively?
Clear Silicone Sealant is essential in construction and repair projects. According to a report by MarketsandMarkets, the global silicone sealant market is projected to reach $6.4 billion by 2027. This growth highlights the increasing importance of effective sealing solutions in various industries. Experts emphasize that selecting the right silicone sealant can significantly influence project outcomes.
John Becker, a renowned expert in sealant applications, once stated, "Misapplication of Clear Silicone Sealant often leads to costly repairs." His insights reflect a common pitfall faced by both DIY enthusiasts and professionals alike. Many overlook proper surface preparation, which can compromise adhesion and longevity. Understanding the best practices for using Clear Silicone Sealant can prevent these issues and enhance your project's durability.
With various applications, mastering the use of Clear Silicone Sealant is key. Whether it’s in bathrooms, kitchens, or outdoor projects, the right techniques can make a notable difference. Focus on aspects like curing time and application methods. Reflecting on past mistakes, one can avoid pitfalls that lead to ineffective seals. Clear Silicone Sealant requires careful consideration and technique to achieve optimal results.
Understanding the Composition and Properties of Clear Silicone Sealant
Clear silicone sealant is a versatile material widely used in construction and home improvement projects. Understanding its composition is essential for effective application. Silicone is derived from silicon, oxygen, carbon, and hydrogen. This creates a flexible, durable seal that withstands temperature extremes and moisture. A report by the American Society for Testing and Materials (ASTM) highlights that silicone sealants maintain their integrity under varying conditions, making them ideal for diverse environments.
One notable property of clear silicone sealant is its adhesion capability. It bonds well to many substrates, including glass, metal, and plastic. However, surface preparation is crucial. Clean surfaces without dust or oil enhance adhesion. A study from the Sealant, Waterproofing & Restoration Institute shows that improper surface cleaning can reduce sealant effectiveness by up to 30%. Users must also consider curing time. While quick-setting options are available, slow-curing types often allow for better final performance.
Despite its advantages, potential drawbacks exist. Some formulations may not be paintable, limiting aesthetic options. In certain situations, the sealant may yellow over time or degrade when exposed to UV rays. A study by the National Institute of Standards and Technology found that UV exposure can decrease seal lifespan by 15% to 20%. Users should weigh these concerns against their specific needs before application.
Top Tips for Using Clear Silicone Sealant Effectively
| Tip | Description | Application Area | Cure Time | Durability |
| Surface Preparation | Ensure surfaces are clean and dry before application. | Windows, Doors, Bathrooms | 1 Hour | 10-20 Years |
| Correct Application | Apply a consistent bead at a 45-degree angle for neatness. | Kitchen and Bath Fixtures | 1 Hour | 10-20 Years |
| Weather Conditions | Avoid applying in extremely cold or wet conditions. | Outdoor Applications | 1-2 Hours | 10-20 Years |
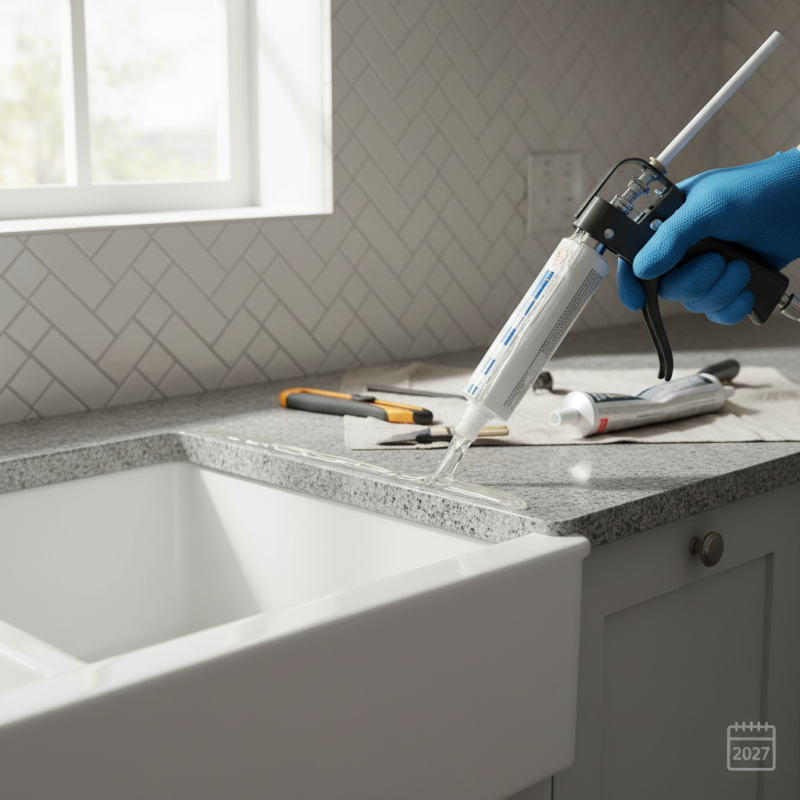
| Use of Caulking Gun | Utilize a caulking gun for precision and ease of application. | Sealing Joints | 1 Hour | 10-20 Years |
| Cleanup | Clean tools and surfaces with solvent before sealer cures. | Post-Application | N/A | N/A |
Step-by-Step Guide to Surface Preparation for Optimal Adhesion
Preparing surfaces before applying clear silicone sealant is crucial for achieving optimal adhesion. Proper surface preparation improves longevity and effectiveness. According to a report by the Adhesives and Sealants Council, 70% of sealant failures stem from inadequate surface preparation.
Clean the surfaces thoroughly. Use isopropyl alcohol or a suitable cleaner to eliminate dust, grease, and moisture. A clean surface allows the silicone to bond effectively. Ensure both surfaces are dry before application. If the surface is porous, consider sealing it first. This step can prevent moisture from seeping through.
For better results, roughen smooth surfaces slightly. Use sandpaper to create texture. This increases bonding area, which enhances adhesion. Be mindful to remove any sanding dust after this process.
Avoid applying sealant in extreme temperatures. Ideal conditions range from 40°F to 100°F. High humidity can also negatively affect curing time. If conditions seem unfavorable, consider waiting for a better day. A little patience can lead to better results.
Remember that even minor imperfections in preparation can lead to sealant failure. Take time to ensure every step is performed correctly. Reflect on your methods and learn from past applications to improve future projects.
Top Tips for Using Clear Silicone Sealant Effectively
This chart illustrates the effectiveness ratings of different tips for using clear silicone sealant. The ratings are based on a scale from 1 to 10, where a higher score indicates better practices for optimal adhesion and sealing performance.
Application Techniques: Achieving a Smooth and Even Silicone Bead
Achieving a smooth and even silicone bead is crucial for effective sealing. Application techniques can make a significant difference in the outcome. A study by the Sealant, Foam and Waterproofing Association indicates that improper application can lead to a 30% increase in sealant failure. Ensuring the surface is clean is the first step. Dust and debris can cause uneven adhesion, which may affect durability.
When applying silicone, use a steady hand. Hold the caulking gun at a consistent angle. Aim for an even pressure to create a uniform bead. Avoid pushing too hard; this can lead to overflow or gaps. Many professionals recommend using a finger or a tool to smooth out the bead after application. This not only enhances aesthetics but also improves adhesion. The ideal bead should be smooth and show even contact with both surfaces.
Reflect on the need for practice. Not everyone achieves a perfect bead on the first try. The technique also varies with different materials. Testing on scrap surfaces can help build confidence. Real-world applications reveal that even experienced users occasionally encounter challenges, leading to less than ideal results. Acknowledge these moments; they are part of the learning process in becoming skilled at using silicone sealant effectively.
Curing Time and Conditions: Factors Influencing Sealant Performance
Curing time and conditions significantly affect the performance of clear silicone sealant. Generally, silicone sealants cure through a process called moisture curing, which requires humidity to activate chemical reactions. According to industry data, silicone sealants reach optimal adhesion and elasticity in humid environments, where humidity levels are above 40%. Low humidity can extend the curing period, leading to suboptimal results.
Tips for effective use of silicone sealant: Ensure the application surface is clean and free of contaminants. This allows for better adhesion, which can reduce curing time. Use a caulking gun for precision. The angle and pressure applied can influence the curing process.
Temperature also matters. Ideal conditions range from 40°F to 100°F (4°C to 38°C). At extreme temperatures, curing may slow down or even stop. A thorough examination of the workspace can help. Keep sealants away from direct sunlight and drafts to avoid inconsistent curing. Imperfections in application can lead to gaps, allowing moisture seepage. This could compromise the sealant’s performance. Always consider these factors for durable and effective sealing.
Remember, when applying silicone, less is often more. Overusing sealant can lead to messy applications and potential failures. Understanding these conditions can markedly enhance the sealant's longevity and effectiveness.
Common Mistakes to Avoid for Effective Silicone Sealant Usage
Using clear silicone sealant can be tricky. Many people make common mistakes that compromise the sealant's effectiveness. One mistake is applying the sealant in humid conditions. Moisture can prevent proper adhesion. It’s best to choose a dry day for application. Another mistake is skipping surface preparation. Clean and dry surfaces ensure a better bond. Ignoring this step can lead to peeling and leaks down the line.
Another frequent issue is over-applying the sealant. Applying too much can create a messy look and difficulty in achieving a clean finish. It’s important to control the amount squeezed from the tube. Sometimes, people rush and end up creating gaps. Patience is key for effective sealing. Additionally, not allowing enough drying time can be problematic. Rushed projects may seem fine initially but can fail when exposed to water. Taking time to let the sealant cure ensures longevity and performance.